Saturday, November 1, 2014

Wireless Repeater Bridge

After 10+ years of using various versions of the Linksys WRT54G, I finally wanted to start using the QoS functionality in DD-WRT. My router was a WRT54G V.2 and the CPU running at 200mhz simply wasn't powerful enough to handle the task.

So after some research I decided to purchase an ASUS RT-AC66U. This router is a beast and works wonderfully, and it's nice to finally have local gigabit ports. The firmware comes with a lot of features and it's also on the DD-WRT list, which is nice.

So I actually had two of the WRT54G routers available. I gave one to a friend and decided to use the other one as a wireless repeater bridge, which is what this post is about.

So what is a wireless repeater bridge? It's a wireless access point that connects to another access point to get its internet connection.

So in my case I have 2 routers.

The ASUS RT-AC66U is connected to the internet and serves as a wireless B/G/N/AC access point (AP) on 2.4 and 5Ghz (two different wifi APs).
The WRT54G is simply placed elsewhere in the house. It gets to the internet wirelessly through the ASUS router and acts as another AP.

The benefit for me is range extension. I have several wireless security cameras over 3 floors and a large backyard that needs coverage. So I put this second router wherever I want and it is a valid 802.11G access point. On the other hand, it also allows wired connections to the routers 5 ethernet ports, so that could be useful in the event there is a non-wireless device that needs access.

The ASUS is running its latest ASUS firmware and the WRT54G is running DD-WRT v24-sp2.

Setup:
I used the wiki instructions at dd-wrt.com (DD-WRT Repeater Bridge). I see reason to repeat their article here.

Their wiki article is a little old but the basics are still there.
The idea is that your main router stays the same and the bridge router gets put into router mode (instead of gateway) with its wireless in "repeater bridge" mode. Its main wireless connection mirrors the connection of the main wireless router so that they communicate. The DHCP and DNS all happens on the main router and the bridge router has a virtual AP that simply passes the traffic to the main router.
The DD-WRT graphic is right on the money for those who need it.

After some initial setup described in the DD-WRT wiki, I setup the bridge router to match the main router.
For router #2 (repeater bridge) the following wireless settings must match exactly: SSID
Security mode (I used WPA2-Personal with AES)
Channel (I used Auto on the main router because the DD-WRT does not have a channel selection in repeater bridge mode.)

Once the setup was complete I have my main SSID as well as the new virtual AP SSID broadcasting. I can trace or ping to any IP within the network whether it's connect to the main AP or the repeater AP. The time returned on pings to the new repeater router have an occasional blip up to 20ms instead of the normal 1-2ms, but that's no big deal. The repeater router is actually handling two wireless streams, one to the main router and the other is to whichever devices connect to the AP. I tested both the wired and wireless connection on the repeater and they work fine.

To sum it up, I've been using DD-WRT for years and they are worth your donation. A lot of people contribute to the effort that puts features into devices left behind by the manufacturers. For someone like me who has been in IT for many years, I appreciate the ability to use old hardware instead of throwing it away.

Cheers!


Tuesday, April 1, 2014

Setting up Symantec DLP FlexResponse Plugin (Part 2)

Why am I writing this: 

  • The documentation is vague and all over the place. Much of it is for Linux based OSes.
  • The certificate-store-path variable in the plugin properties does not work, so that part of the documentation is wrong, and the trick (at least for Windows server) is to put the keystore on the C: root.
  • It's not obvious to a non-PGP user how to set multiple users or a group of users as "admin." 
  • Answers are hard to find, so my goal is to limit the trial-and-error approach 

In Part 1 (Setting up Symantec ERM Service Between DLP and PGP) I described what it took to setup the ERM service to communicate between DLP v.12 and PGP Universal Server 10.2.

Part 2: Configuring the Symantec DLP FlexResponse Plugin

So in Part 1 I established the ERM Service. Part 2 is all about configuring DLP to talk to that service.


Step 1 -  Install the PGP Plugin files on the DLP Enforce Server

Now on the DLP Enforce server:


From the extracted FlexResponse files (Platform download, FlexResponse_Plugins folder\PGP, "Symantec_DLP_Plugin_PGP_1.0.2.0.exe"), copy the plugin jar (PGPNSFlexResponsePlugin.jar) file and the plugin properties (PGPNSFlexResponsePlugin.properties) file into the Symantec DLP plugins folder, i.e. "C:\SymantecDLP\protect\plugins" (location may vary depending on OS or installation).
Make sure the local DLP "protect" user account has read/execute rights to these two files.


Register the plugin with the DLP Enforce server by editing the plugins.properties file located in the config folder in the DLP install folder.
  • <drive>:\SymantecDLP\Protect\config\Plugins.properties
Add the name of the plugin .jar file to the following attribute: com.symantec.dlpx.flexresponse.Plugin.plugins. The attribute may be commented out initially.
It may look something like this:
com.symantec.dlpx.flexresponse.Plugin.plugins = PGPNSFlexResponsePlugin.jar


Step 2 -  Configure SSL Communication on DLP

Still on the DLP Enforce server: 

Now, configure the SSL communication between the ERM service and DLP Enforce. This is required if the ERM service is not running on the Enforce server.

Find the keytool.exe program. This should be located in the DLP installation folder: <drive>:\SymantecDLP\jre\bin\keytool.exe.


Use these commands to generate, export, and import an SSL certificate. Document the private and public passphrases for future use. The private pass is sensitive and the public pass is non-sensitive.


Open up a command prompt as administrator:
Start, type "cmd", right-click on cmd.exe and "run as Administrator"

Then run each of these 3 commands separately in order.
 

Generate (the certificate and personal information exchange "pfx" file):
<drive>:\SymantecDLP\jre\bin>keytool.exe -genkeypair -alias ermservice -keystore ermservice.pfx -storetype pkcs12 -keyalg RSA -dname "CN=<yourERMServiceHostname>" -keypass <private passphrase> -storepass <private passphrase>

Export (the certificate "cer" file):

<drive>:\SymantecDLP\jre\bin>keytool -exportcert -alias ermservice -file ermservice.cer -keystore ermservice.pfx -storetype pkcs12 -storepass <private passphrase>

Import (certificate into the java keystore "jks" file):

<drive>:\SymantecDLP\jre\bin>keytool -importcert -keystore ermservice.jks -alias ermservice -file ermservice.cer -v -trustcacerts -noprompt -storepass <public passphrase>

After running these commands, there will be three new files located in the same location as the keytool.exe file. 
  • Ermservice.pfx (personal information exchange file)
  • Ermservice.cer (certificate)
  • Ermservice.jks (java keystore). 
As a side note: if you already had an existing .pfx and .cer, I believe you could generate the keystore file from those using different commands.
 

The .PFX file is used for importing the private/public key-pair into the ERM service on the ERM service host machine. Copy this file to the ERM Service host machine.
The .JKS file is the public key that must remain on the DLP Enforce server. Put this file in the root of the C: drive on the DLP Enforce server.
The .CER file is not needed for this task.


Step 3 - Configure the PGP Plugin


Still on the DLP Enforce server:

Edit the plugin properties file (PGPNSFlexResponsePlugin.properties) and pay attention to the following settings:
  • prot-svc-host="your ERM Service host machine name"
  • prot-svc-session-type=secured (if you're using SSL)
  • certificate-store-path=<path to jks file>
***The default value is "${system:dirs:common-app-data}\Symantec\SDLPERM\SCache\REST_SSL_Cert" but this path would not work for me. The documentation indicates that one should use "an appropriate path" on the server. This default folder structure does not exist on the DLP Enforce server. I tried many different paths, but the only path that ended up working was the root of the C: drive.
***So if the SSL fails to connect, put your JKS file in C: root "C:\whatever.jks" and use this as the variable: certificate-store-path=C:\whatever.jks

  • certificate-store-password=<public passphrase from certificate creation>
This following value will vary based on your needs. The users or groups assigned will have access to files encrypted by the plugin. The values can be a comma delimited list of PGP keys (I: prefix), user names (U: prefix), or group names (G: prefix). If no prefix is specified the plugin will assume "G:".

Examples:
  • I:0x######## (keyid of user or group)
  • U:John Doe (user name)
  • G:PGP Admin (group name)
For this to work, any user or group on this list must be manually imported into the ERM service account's keyring on the ERM service host machine (PGP Desktop) otherwise an error will be thrown by the plugin. 

PGP Universal Server web console -> Keys -> find user/group -> export public key -> save to file.
then
On ERM Service Host open PGP Desktop -> File -> Import -> select file.

I was unable to use the group "G:" and user name "U:" prefixes, but I could successfully use the keyids for the users and groups to achieve the same result. So in my case, I used the PGP Universal server's "Everyone" group keyid and the organizations adk (alternate decryption key). This ensures that any encryption done through the DLP Flex Response plugin will be visible to anyone who has the PGP Desktop enrolled with this organization.
  • target-protection-info-default=I:0x########,I:0x########
Keep in mind that this list is just user access. The "Admin" access is defined by the "signer" variable in the ERM service configuration.

Uncomment out (remove the pound symbol) the following lines in the properties file. These values will be placed into the DLP incident  record when the manual response rule is run.
  • #target-protection-info-attribute-name=PGP NetShare Target Keys
  • #result-status-attribute-name=PGP NetShare Protection Result
  • #result-protection-attribute-name=PGP NetShare Result Keys
Save the properties file and restart the vontu manager service (DLP Enforce server)


Step 4 - Configure SSL Communication on ERM

On the ERM Service host machine:

Now we need to import that .JKS file into the ERM service.
 

You should already have placed the .PFX file from the DLP Enforce server on this ERM service host machine.
 

Open up a command prompt as administrator:
Start, type "cmd", right-click on cmd.exe and "run as Administrator"
 

Change directory (cd) to the location of the DLP ERM Service, which includes the sdlperm_import.exe file
c:\Program Files (x86)\Symantec\DLP ERM Service\ (location may vary)
 

Run this command to import the .PFX file:
sdlperm_import.exe --ssl-cert-pfx --passphrase=<private passphrase> --user=<domain\erm service user account name> --password=<erm service user account password> --infile=<.PFX file path and name> I.e. c:\ermservice.pfx
Then restart the ERM service "Symantec Data Loss Prevention ERM Service"

This should completely enable SSL communication between the ERM service and DLP Enforce. 


Step 5 - Test PGP Netshare on the Command-Line

On the ERM Service host machine:

This is a test of the pgpnetshare.exe install without DLP just to make sure it works.

Open up a command prompt as administrator:
Start, type "cmd", right-click on cmd.exe and "run as Administrator".


Change directory to the pgpnetshare install folder: C:\Program Files (x86)\PGP Corporation\PGP Desktop (location may vary)
 

Run this command:
pgpnetshare.exe --verbose -e "\\<hostname>\<sharename>\<filename>" -s "<signer keyid>" --passphrase "<signer's keyring passphrase>" -r "<signer keyid>"

This will simply encrypt the specified file. The -e switch encrypts, -d decrypts. Type pgpnetshare.exe --help for a full list.

If that worked, you know the encryption piece if functional.


This completes the setup of the DLP Enforce Plugin, SSL communication between the ERM Service host and DLP Enforce, and testing basic encryption using the pgpnetshare command-line. Part 3 will focus on setting up the DLP Policy, the response rule, and testing.

Tuesday, March 11, 2014

Setting up Symantec ERM Service Between DLP and PGP (Part 1)

Part 1:

Why am I writing this: 

  • The documentation is vague and all over the place. Much of it is for Linux based OSes.
  • The certificate-store-path variable in the plugin properties does not work, so that part of the documentation is wrong, and the trick is to put the keystore on the C: root.
  • It's not obvious to a non-PGP user how to set multiple users or a group of users as "admin." 
  • Answers are hard to find, so my goal is to limit the trial-and-error approach

Overview:

  1. Symantec DLP (Data Loss Prevention) discovers data that may be deemed sensitive or important based on policies created by an organization.
  2. PGP encrypts data
  3. It is possible to integrate the two products so that incidents generated by DLP can be then used to encrypt the file(s) in question.

In this scenario there are three servers: PGP Universal Server/Symantec Encryption Management Server (v.2.3.0) (SEMS), ERM (Enterprise Rights Management) Server, and DLP Enforce (v.12.0.1) (front end).


ERM Server:

Prerequisites: Windows Server 2003 SP2/2008 (x84/x64) (not R2)
The ERM service account user must be:
  • An AD domain acct
  • Be able to login to the ERM server host computer.
  • Be enrolled with PGP NetShare and have a key-pair resident in its local key-ring.
  • Be granted read/write access to the file-shares on which files are to be encrypted. This is required only for NetShare, due to limitations of the PGP NetShare command-line.

DLP Enforce Server:

Prerequisites: DLP v.10+

PGP/SEMS:

PGP Desktop/PGPNetshare v.9.12+
For group lookup, the PGP Desktop must be bound to a PGP universal server v.2.12+.

And a general description of how PGP works.

An organization wants to encrypt files/folders/shares. This will render those "files" useless to anyone who does not have the key and decryption software. The trouble with single keys is that they can be lost easily or passwords can be forgotten. Even if the keys are not lost, having only one user do the management of the decryption/encryption process would be unwieldy. An encryption server hosts all keys for an organization, provides a single place to go to set/get keys/users/devices, and can enforce use of a backup key and/or a group of users who have the ability to manage encryption for the organization.

PGP encryption has three levels of encryption users: Admin, Group Admin, and User. The Admin user/group can decrypt/encrypt and assign permissions to all levels, and there can only be one (Highlander!). A Group Admin can assign permissions to other Group Admins and Users. A User can read the encrypted file.

Encrypted files on a computer without encryption software will appear corrupt or inaccessible because the computer has no way of understanding how to read the file.

However, opening an encrypted file on a computer with encryption software will either allow access transparently (the file will be automatically decrypted and opened after the PGP passphrase is entered once (and cached for session)), or there will be some sort of "access denied" message. There will also be a new tab on the file properties called "PGP Netshare" to view and edit the encryption access permissions similar to the windows file security tab.
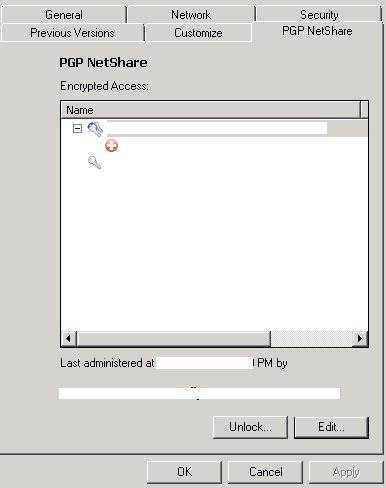
PGP Netshare file properties tab

And there will be a context menu that allows a file to be encrypted, re-encrypted, or decrypted.
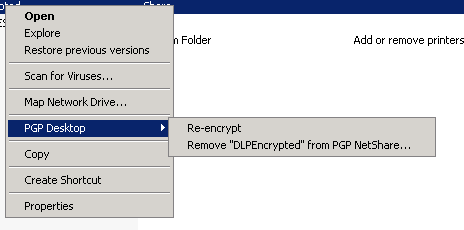
PGP Desktop file context menu


The goal is to allow objects to be secured without infringing upon the user's ability to work. The way this all comes together is through encryption groups that are managed by the PGP Universal server. When user with a key and the correct software takes sensitive data off-site, they can still open that file. If the encryption access is setup using groups, the user's device will require a connection to the organization's PGP server to verify that the current user exists and has access to the file. This adds a lot of security. So what we want the DLP integration to do is:
  1. Encrypt files
  2. Talk to the PGP Universal server
  3. Set Admin permissions to a group of users
  4. Set User permissions to a group of users

Step 1 - Configure a DLP related encryption group on the PGP Universal Server

On the PGP Universal Server (web interface):

Go to Consumers (tab)-Groups and setup an administration group for your encrypted files (maybe call it "DLP_Admins"). Users in this group will be able to decrypt and manage the access for encrypted files and folders.
Then go to Keys (tab)-Managed Keys. Click on the group name you setup as your administration group. Click Export-Export key-pair, and enter a passphrase. **Document this passphrase for later**. Save this export as a file. It contains the private and public key-pair for the group.

Step 2 - Install PGP Desktop and Import Key From Step 1

On the ERM Service host server:


Install PGP Desktop on the ERM Service host computer (This will require a reboot.)
Enroll the ERM service account on the PGP Universal server. The enrollment process should be initiated automatically after the reboot. Depending on your PGP configuration it may require an AD account, an email address, or potentially even a silent enrollment. It is also possible that the ERM service account was enrolled in the past and a key may already exist for this account.

You must have a local keyring for this service account that is not SKM key mode. SKM key mode does not allow for a known keyring passphrase.

If your service account has an SKM key:
Look at the account's  key type in the Universal server. 
Open PGP desktop, go to Tools(menu) - Options - Advanced(tab). Click "Reset Key", choose SCKM, enter the a passphrase (*the same one used when exporting the administration group key-pair*), and complete.

Still in PGP Desktop on the ERM host machine, go to File-Import, select the administration group key file, and click "Import." In your keyring (PGP Keys(tab)-All Keys) you'll see this administration group. Double-click the group name and choose "Implicit" under the "trust" selector. Because you imported the keypair containing both the public and private keys you can now sign encryption using this group's key. Any user in this PGP group will be able to administer a file encrypted by this service.

Step 3 - Install and Configure ERM Service


Extract the ERMService files by running the PGP Plugin exe:
This will be found in the DLP Platform installs folder: Symantec_DLP_12.0_Platform_Win-IN\DLP\12.0\FlexResponse_Plugins\PGP\Symantec_DLP_Plugin_PGP_1.0.2.0.exe

Install the ERMService.MSI (this is the middle-man between DLP and PGP/SES)
**This can be installed on the DLP Enforce server if it meets the prerequisites (pre-server 2008 R2).

Configure the service by editing the xml file here:
C:\Program Files (x86)\Symantec\DLP ERM Service\sdlperm-config.xml (location will vary depending on OS)
You'll have to copy the file elsewhere to edit it and then copy it back.

In the <web-services> section enable the REST web interface
<enabled>true</enabled>

In the same section make sure SSL is enabled if the ERM service is not installed on the DLP Enforce server.

In the <pgp-netshare-config> section, set <enabled> to true, and make sure the cmdline-path points to the installed location of PGP Desktop.
<cmdline-path>C:\Program Files (x86)\PGP Corporation\PGP Desktop\pgpnetshare.exe</cmdline-path> (location will vary depending on OS)

Fill in the signer you will use (the keyid of the administration group in keyring).
<signer>0x########</signer>

Put the keyring/group export passphrase here.
<passphrase></passphrase>
You will remove this passphrase later on because leaving it here in plaintext is insecure.

You could use the service account key/username as the signer as well, but know that the signer becomes the "Admin" of the encryption and will be the only user who can decrypt or edit access to the encrypted object. This would be a management/workflow hassle and you don't want to use a service account for this, so it's better to have a group do this.


The following is optional:
Now edit this file: C:\Users\<accountname>\AppData\Roaming\PGP Corporation\PGP\PGPprefs.xml (location will vary depending on OS)
Search and find "<key>useAlwaysEncryptToKeys</key>" 
This key holds an array of implicit user keys to add to any encryption. This is useful if there are some users or groups (like the "Everyone" group in PGP Universal server) who should be always able to read an encrypted object.
Add additional keys as needed. i.e. <string>0x#######1</string><string>0x#######2</string>
You can also search for "<key>ADKKeyID</key>" and put in your organization's alternate decryption key into the field. I.e. <key>ADKKeyID</key><string>0x########</string>

Then restart the ERM service "Symantec Data Loss Prevention ERM Service"

This completes the setup of the ERM Service. Part 2 will focus on setting up the DLP Plugin.

Friday, January 17, 2014

Hide Specific Buttons on a SharePoint 2010 Ribbon Using Javascript

I recently had a project where I needed to have the user take action on SharePoint data using a custom form, and then have a workflow handle the updates into another library, thus preventing the user from directly managing the main body of data. Contribute permissions were required because SharePoint Workflows don't have the ability to 'run as' admin or service or any other user or to set permissions on an item in the workflow. Both of those would be great additions to the SharePoint Workflow foundation.

So I used a combination of custom forms, specific permission levels, audience targeted web parts and other means to show the user only what they need to see and create "security through obscurity."

Contribute(edit) permissions are required in this case, but I wanted to allow a user to "view" a list item without having the prominent "Manage" ribbon group and the "Edit" button at the top of the form page (dispform.aspx, etc...)

There are fairly easy ways to hide the ribbon from certain users which work well but it's not granular enough and my permissions on this site are not that simple. It is also possible to create a custom ribbon and/or code and deploy to achieve these things.

BUT:
I wanted an easy, quick, and non-invasive means of shutting off certain buttons. So here is what I did.

The ribbon is split up into tabs. Each tab can have one or more groups of controls, and each group can hold one or more controls.


It's easy to find the id of any one of these and then use javascript to edit the object.

In Internet Explorer, hit F12 (developer tools) or use Firebug or some other equivalent in another browser.
Find the ribbon using the click tool or search for "<div class="loaded" id="RibbonContainer">"


You can see the structure of the whole ribbon there along with all of the element IDs. Pay attention to the CSS classes for an easy way to pick out the pieces.


OK, so anyone familiar with javascript knows that you can grab the object and set a style parameter like this:
object.style.parameter = value;
So it is logical that to hide the group, I just set object.style.display = 'none'; and it will disappear.

Not too complex, except that SharePoint ribbons are loaded when needed, not on page load, so you can't just put some javascript at the end of the page and hide the element. So first you need to make sure the object exists. If it does not exist, wait and try it again in some period of time. And lastly, if you don't want a looping script, so set a counter to make sure it only tries a few times before completely giving up.

Here is my example using the "Clipboard" group

<script language="javascript">
var cntr = 0; //set counter
function hidegroup(){
    if(document.getElementById('Ribbon.EditingTools.CPEditTab.Clipboard') != null){ //check to make sure object exists
        document.getElementById('Ribbon.EditingTools.CPEditTab.Clipboard').style.display = 'none'; //hide it
    }else if(cntr<6){//does not exist, check counter
        cntr++;//increment counter
        setTimeout('hidegroup()', 1000); //wait 1 sec and then repeat
    }
}
</script>
  • The counter starts at zero and once it runs 5 times, it quits.
  • If the object exists, it hides it. I noticed that if you set innerHTML to an empty string, the other buttons may not function.
  • If the object doesn't exist it increases the counter by one and then waits 1,000 miliseconds and then calls the function again.
To use this on a page, edit and place a content editor web part on the page under the form web part, edit the HTML of the content editor web part and put the script into the HTML field.


Set the web part to hidden (Edit Web Part -> layout (section) -> Hidden) so that nobody sees it. Hidden web parts are still on the page and the javascript will run just fine.

The last step is to use the web part's audience targeting field (in the "Advanced" section) to decide who will see the web part. The targeting can be done on groups and/or users. Whoever is targeted will have the web part, and whoever has the web part will have the ribbon group disabled.


This is perfect for a form like dispform.aspx or editform.aspx that automatically displays the ribbon. The only delay is in loading the ribbon. Other pages have ribbons that load contextually whenever the user interacts with a control that has a ribbon. Removing controls or groups for those pages could be done by removing the counter, which would cause a constant loop waiting for the element to show up.


For me, this works perfectly because it was a quick fix, can be targeted to a SharePoint security group, can remove specific items, and is all done in the browser.

Disclaimer: this is by no means the best way, but it is very simple and quick.